POSTS
Flashing QMK DFU firmware on a Pro Micro
Naming things is hard. As a software engineer, I know this all to well. The times I've puzzled, despared, cursed at whoever named some variable, only to have git blame tell me that this particular variable was added by a certain remmelt…
Either way.
In this post I will document the steps I took to flash the qmk-dfu bootloader onto a Pro Micro Arduino clone.

Terms
First off, here are some terms I'll be using.
- QMK: Quantum Mechanical Keyboard, QMK Firmware is a keyboard firmware with some useful features for Atmel AVR controllers.
- DFU: a bootloader by Atmel
- qmk-dfu qmk's fork of dfu, with some nifty features for keyboards
- Caterina: Arduino bootloader, usually installed on Pro Micros that come with a keyboard
- Catalina: Apple's macOS version 10.15
Keyboard programming workflow
I have a clone of the qmk-firmware project on GitHub, with some additional files and one “handy” script that translates from the qmk config json to a C file.
This works reasonably well, I go to the qmk config site, upload my current json, make any changes, download the new json, use the script, and run make preonic/rev3:remmelt:dfu-util to re-program my Preonic.
Add the latest json version to git, done.
Romac
The Romac is a nice little 4x3 keypad that is powered by a Pro Micro clone.

After some fiddling, I got it to work with the workflow mentioned above. Then came an update to macOS Catalina… and for some reason the firmware flashing stopped working. I was already polishing off a Raspberry Pi to do the programming for me, but then realised I could also flash the qmk-dfu bootloader on the Pro Micro, and I would be able to program the keypad with my Mac. This sounded way more convenient, if not a little daunting.
High level steps
The steps I took to solve this problem.
- Turn Arduino Uno into a bootloader programmer
- Wire up the Pro Micro to the Arduino Uno
- Flash the qmk-dfu bootloader and set the fuses
Bootloader Programmer
We need a programmer to load the bootloader onto the target device, i.e. the Pro Micro. I used an Arduino Uno I have lying around.
After a quick brew cask install arduino, and plugging in the Uno, we can open the ArduinoISP sketch in the Arduino IDE. open > ArduinoISP > ArduinoISP
Now find the port the Arduino is using: ls /dev/tty*, usually it's something like /dev/tty.usbmodem141401.
Under Tools, set the board to Arduino/Genuino Uno, the processor to ATMega 32u4 5v, and the port to /dev/tty.usbmodem141401. Now upload the sketch onto the Uno, and this step is done.
Wiring up the Pro Micro
I took the Pro Micro out of the Romac and plugged it in to my breadboard. To my dismay it would not stay stuck, I had to press it down while programming… hm. Using 6 wires, I wired it up as follows.
- VCC to VCC
- GND to GND
- Uno D10 to Pro Micro Reset (RST)
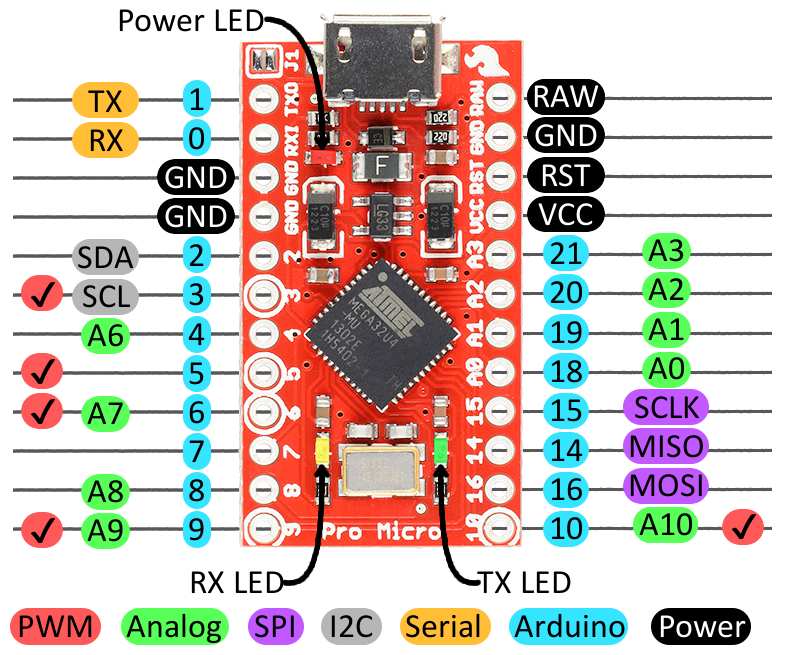
- Uno D11 to Pro Micro MOSI (16)
- Uno D12 to Pro Micro MISO (14)
- Uno D13 to Pro Micro SCLK (15)
Here's the pinout of the Pro Micro.

Flashing the bootloader
Finally we get to flash the bootloader onto the Pro Micro.
These is the command I used:
avrdude -p atmega32u4 -c stk500v1 -b 19200 -U flash:w:"/Users/remmelt/dev/side/qmk_firmware/util/bootloader_atmega32u4_1_0_0.hex":i -P /dev/tty.usbmodem141401 -U efuse:w:0xC3:m -U hfuse:w:0xD9:m -U lock:w:0x3F:m
This resulted in the following output.
avrdude: AVR device initialized and ready to accept instructions

Reading | ################################################## | 100% 0.02s

avrdude: Device signature = 0x1e9587 (probably m32u4)
avrdude: NOTE: "flash" memory has been specified, an erase cycle will be performed
         To disable this feature, specify the -D option.
avrdude: erasing chip
avrdude: reading input file "/Users/remmelt/dev/side/qmk_firmware/util/bootloader_atmega32u4_1_0_0.hex"
avrdude: writing flash (32768 bytes):

Writing | ################################################## | 100% 0.00s

avrdude: 32768 bytes of flash written
avrdude: verifying flash memory against /Users/remmelt/dev/side/qmk_firmware/util/bootloader_atmega32u4_1_0_0.hex:
avrdude: load data flash data from input file /Users/remmelt/dev/side/qmk_firmware/util/bootloader_atmega32u4_1_0_0.hex:
avrdude: input file /Users/remmelt/dev/side/qmk_firmware/util/bootloader_atmega32u4_1_0_0.hex contains 32768 bytes
avrdude: reading on-chip flash data:

Reading | ################################################## | 100% 0.00s

avrdude: verifying ...
avrdude: 32768 bytes of flash verified
avrdude: reading input file "0xC3"
avrdude: writing efuse (1 bytes):

Writing | ################################################## | 100% 0.02s

avrdude: 1 bytes of efuse written
avrdude: verifying efuse memory against 0xC3:
avrdude: load data efuse data from input file 0xC3:
avrdude: input file 0xC3 contains 1 bytes
avrdude: reading on-chip efuse data:

Reading | ################################################## | 100% 0.01s

avrdude: verifying ...
avrdude: 1 bytes of efuse verified
avrdude: reading input file "0xD9"
avrdude: writing hfuse (1 bytes):

Writing | ################################################## | 100% 0.02s

avrdude: 1 bytes of hfuse written
avrdude: verifying hfuse memory against 0xD9:
avrdude: load data hfuse data from input file 0xD9:
avrdude: input file 0xD9 contains 1 bytes
avrdude: reading on-chip hfuse data:

Reading | ################################################## | 100% 0.01s

avrdude: verifying ...
avrdude: 1 bytes of hfuse verified
avrdude: reading input file "0x3F"
avrdude: writing lock (1 bytes):

Writing | ################################################## | 100% 0.01s

avrdude: 1 bytes of lock written
avrdude: verifying lock memory against 0x3F:
avrdude: load data lock data from input file 0x3F:
avrdude: input file 0x3F contains 1 bytes
avrdude: reading on-chip lock data:

Reading | ################################################## | 100% 0.01s

avrdude: verifying ...
avrdude: 1 bytes of lock verified

avrdude: safemode: Fuses OK (E:C3, H:D9, L:FF)

avrdude done.  Thank you.
Results!
Now I can use qmk-toolbox or the keyboard programming workflow mentioned above to program my Romac, even on Catalina! Yay.
Programming the Romac is now as simple as make kingly_keys/romac:default:dfu, and works flawlessly on macOS Catalina 10.15.1.